|
|
Piranha P2
Do-it-Yourself Buggy
|
|
|
|
|
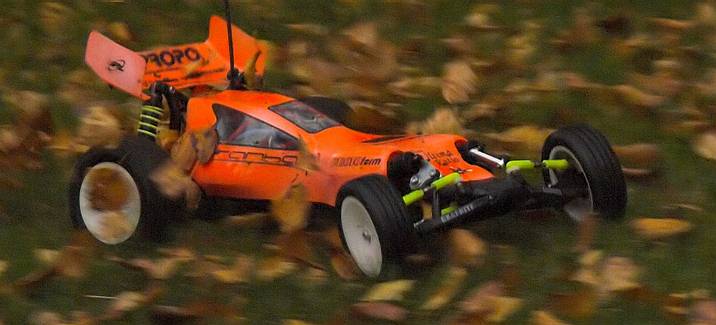
Lean
mean killing machine ... |
|
|
|
Looking at the variety of currently
avaliable 2wd EP buggies ranging from low price rookie model up to
high end team kit you'd nearly have to justify yourself for bringing
up your own thing. Alas, lots of interesting cars will only be
offered as RTR-packages but still you can find hobbyists out there
who enjoy building their whips clearly as much as racing them.
Markus Simon ("madmax" in the
Forum) proves to be one of those modelers. His "Piranha"
buggy does it again, the "P2" alluding to the second edition. Let's
see if it can keep up with its namesake!
All hyperlinks marked like this
will be opened in a new browser window!
|
|
|
Rounding up |
|
|
|
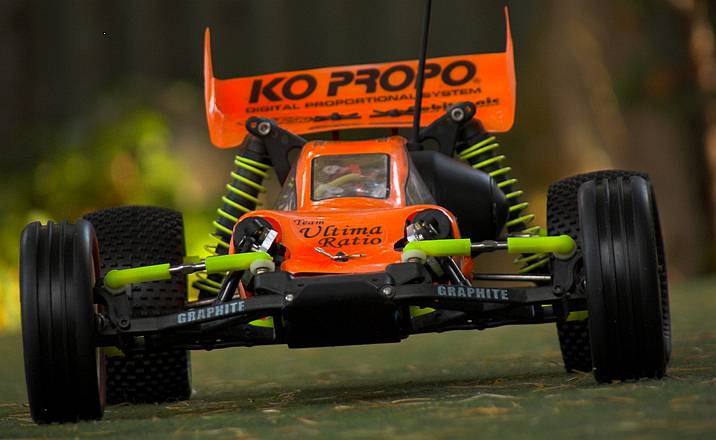
The Piranha buggy concept is meant to combine ideas and technologies
currently used in all different sections of R/C car racing.
-
Lithium-polymer batteries:
The newest generation excels the proven nickel
metal hydride batteries in power density at a much
lower weight. A Li-Po pack with only marginal voltage
drop under load condititon and a capacity of 3200 mAh weighs just about 200
grams and is lots smaller than an equivalent
pack of older generation cells.
The Piranha P2 employs two Kokam 3200HD cells
providing 7.4 volts when connected in series.
Most lithium-polymer batteries are only covered in a
thin kind of foil which makes them light but also
vulnerable to mechanical damage. So in the Piranha
P2 part of the chassis' job is to protect the
batteries effectively.
Lithium polymer cells need chargers that are
suitable for this kind of battery type. Like their
nickel buddies they're not too keen on overcharging
hence lipos mustn't be connected to any conventional
nicad/NIMH charger! (also see
battery-FAQ
concerning this!)
-
„Mid motor“:
Any usual 2WD buggy will have its motor located
behind the rear suspension. This moves the center of
gravity backwards and thus helps the rear end to
gain more traction. The downside of having the motor
mass out of the center is a certain amount of
instability: When cornering, the car will
-overstatedly- act like a pendulum.
With the battery of the Piranha P2 only weighing
half of any conventional nicad/NIMH pack the COG
issue is solved, so there are no objections
against moving the motor to the inside of the car -
except one's really into making wheelies.. Hence the
mid motor concept.
-
„Push-rod“-linkage:
Horizontal shock absorbers became famous with the Tenth-Technology „Predator“
buggy.
Inherent hassle with track setup and complex linkage
geometry kept them from being more commonly used.
On the other hand low profile shocks would
definitely assist a cuneiform 2WD buggy outline with
an emphasis on rear end grip. In times when
additional front end grip is needed another wing in
the nose area can be attached effortlessly - so
let's have a go!
|
|
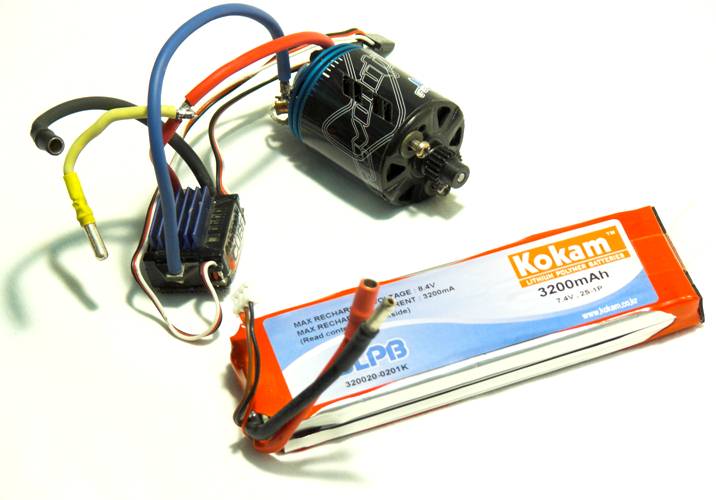
Robitronics' ICube ESC is one of the first lipo-compatible speed controllers for brushed motors. It will
supply the Peak Racing Vantage motor with the energy
provided by 2s Kokam cells. |
Looking at this setup, it doesnt't take a genius to figure out that
the Piranha P2 will never be race-legal; but nevertheless: This is
about the joy of building plus testing and about innovations!
But there remains a question that might irritate some readers ready
to experiment: How on earth should complex parts like suspension arms,
hub carriers or even gear parts be produced? Not at all, for the best of it
- because building those spare parts would cost way too much money
and time!
The thoughtful hobbyist is likely to start out with a complete donor car
and therefore prevent himself from facing total darkness when it
comes to more delicate details like suspension geometry. A
Team Losi
XXX Kinwald Edition had been the favourized candidate for
the Piranha P2. As the P2 would somehow use both front and rear
suspension
all the holes have to be copied to the new chassis accordingly. To
accomodate the mid motor setup while efficiently protecting the lipo
pack at the same time a tub chassis has to be built.
|
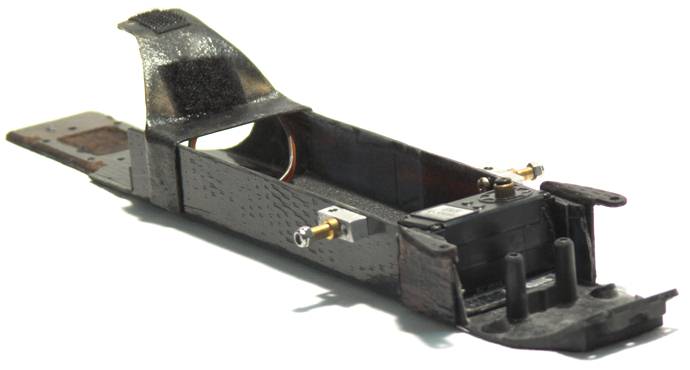
Laminating 101
The chassis of the Piranha consists of a hand laminated
u-profile which is cut and drilled after moulding. In
order to save expenses and to facilitate machining it is
designed as a sandwich construction. This means that
only the first and last layer will be carbon fibre and
provide most of the laminates' stability.
In between glass fibre cloth is used as an easy to
handle and light weight coupling layer. The core is made
of Kevlar 49 high module fibres being an optimum
material due to their low specific weight and even more
so enhancing the chassis' impact strenght.
A planed block of wood is used as a positive mould -
either end being about five centimetres longer than the
reinforcement layers of the chassis. The radii of the
longitudinal edges have to be adequately shaped to avoid
residual stress. Furthermore the mould has to be higher
than the actual chassis because cut-off has to be kept
in mind. The inner width has to be in accordance with
the lipo pack that will be used. |
 |
To avoid the complicated treatment of the wooden block
with mould release agent it has to be completely wrapped
in PET foil. Upon this the epoxy impregnated layers of
reinforcement fibre have to be arranged.
When the chassis reaches a thickness of about 3-4
millimetres it is covered in another piece of foil. Now
the excess resin has to be removed from the laminate. In
order to do this it has to be pressed between panels,
held together by c-clamps. (First from the top, then
from the sides) To ensure a constant laminate thickness
the panels have to be shimmed with small aluminum plates
- 3mm for the bottom of the chassis, 2mm for the sides.
Laminating uses hazardous materials, machining will
produce particulate matter that may be harmful to your
health - hence it is advisable to wear proper protection
masks and gloves!
|
|
 |
|
|
|
It's taking shape ... |
|
|
|
Some work has
still to be done on the Losi-compatible profile before it starts
resembling a buggy. The chassis has to be stiffened towards the
gearbox at the rear and the bulkhead at the front. Due to their
complex shape these reinforcement parts are modeled out of cardboard
and then adapted to the chassis.
All drilling has to be done with similarly high precision,
especially when it comes to the mounting holes of
suspension-relevant parts like the rear pivot block.
At the front end the kickplate of the XXX is ground down to fit the
slimmer chassis. Instead of attaching it with four counter-sunk
screws it is roughened up and extensively glued into place with
epoxy. This kind of assembly is likely to take much more abuse than
a bolted connexion due to the better transmission of force. (Given
that it has been done with care)
The steering servo needs gluing too: It's the only way to fix a 22mm
high "low profile"-servo after it has been deprived of its mounting
links. At least it is glued in a forward-thinking fashion so that it
can still be opened to replace gears or bearings when required.
At the rear end it goes on with the gearbox. It is simply turned
around together with the shock tower and mounted onto the chassis.
That's why the rotating direction of the motor has to be reversed.
This means not only a simple change of the motor wires but also
adjusting the timing respectively. Turning the endbell 180 degrees
would have the same effect but you'd lose the timing marks for
orientation.
Back at the front end the Piranha P2 already starts taking the shape
of a buggy. Corresponding holes have to be drilled into the chassis
to mount the shock absorbers. The rocker pins are bolted into the
Losi bulkhead. The bell-crank levers are ball raced to provide a
smoothly working suspension. Additional rubber pads prevent the pins
from breaking in rough conditions. Some plastic rod ends, threaded
bolts and Tamiyas' "mini CVA shock unit II" get the front suspension
up and running. Front buggy springs from Team Associated are used to
find a reasonable setup. The rear end suspension uses conventional 1
inch Losi shocks. Two things have to be paid attention to: The
center of gravity is a little bit more towards the front, so a
softer rear end will be needed. Then again an overall softer setup
is required due to the considerably lower vehicular weight of 1200
grams.
|
|
|
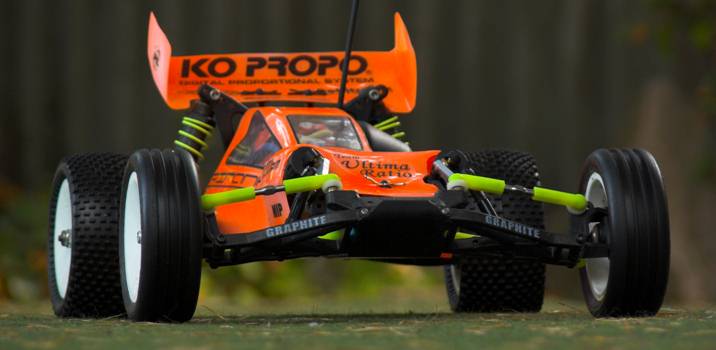
Access
all areas: a closer look |
|
|
|
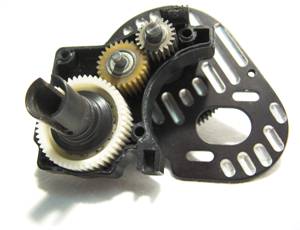
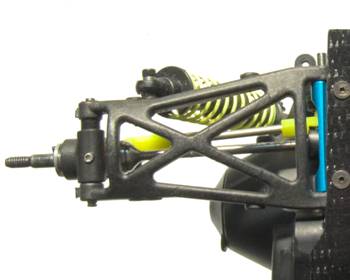
Transmission
powered by Team Losi:
All the gears are taken fom the first XXX-series
providing an internal gear ratio of 2.56:1. The ball
differential has been equipped with a ceramic thrust
bearing from Corally because the thin thrust washers of
the original diff are likely to run in and break apart
when confronted with higher moments of torque.
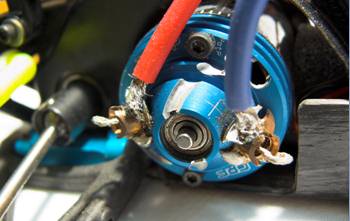 |
Because the gearbox is
turned to fit into the Piranha P2 the rotating direction
of the motor has to be reversed too. Consequently, only
timeable motors (or brushless motors, which are timed by
the controller) can be utilised in the P2. The preferred
rotating direction has to be set by adjusting the timing. |
Both front and rear end
are taken from the
Team Losi XXX-Kinwald. The front suspension uses thread
end bolts instead of the rather frail hinge pins and
e-clips. Thus play is reduced and the suspension gains
more reliability and overall strenght. Also the rear end
has been deprived of all its e-clips: a set screw in the
rear hub is holding the hinge pin in place.
The rear arms are reversed left to right in order to
draw the rear axle nearer to the motor and therefore
move the centre of gravity a bit backwards. |
 |
 |
|
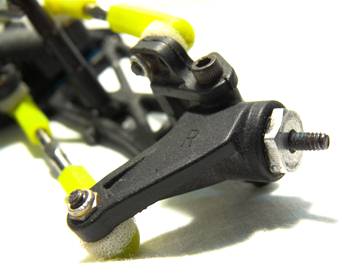
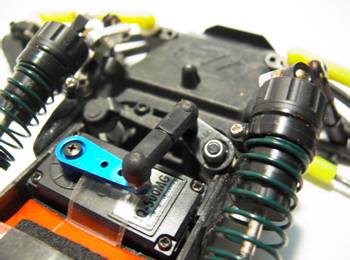
No more has the front
shock setup anything in common with the stock Losi XXX.
The push rod suspension features ball raced rubber
padded rockers and Tamiya's "short shock-unit II". The aluminum parts on the main
chassis act both as a shock mount and battery strap
holder at the same time. |
 |
 |
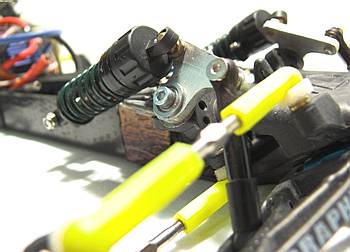
Due to the mid motor setup and
the slim chassis ridiculously little space is left for
the steering parts. Hence the original servo mounting had to
be left behind.
A 22 millimetres high
"Low-Profile" Servo (GWS IQ 500-MG) is used
instead. Cut down as far as possible it has to be CA'ed
into the chassis. Furthermore, the connection cable to
the receiver was given a new exit on the broadside of
the servo. All the internals can be reached from the top
side - so there is no need to detach the whole thing any
time soon.
The steering mechanism itself is a modified Losi-design
built to collaborate with the new steering servo position. |
 |
|
 |
|
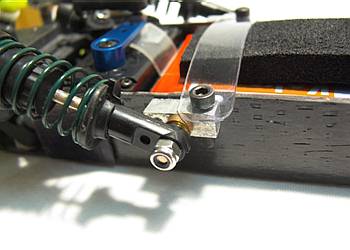
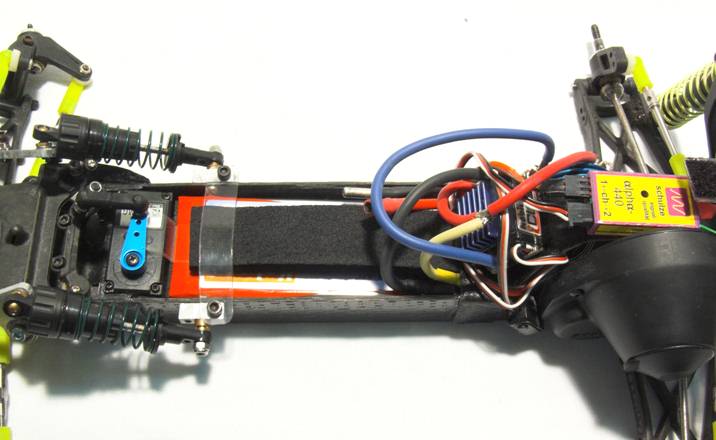
"Economy" is the thought
that comes to mind: space is pretty limited in
the race - ready chassis. All components have to be
crammed together, the ESC even using what little
vertical space is left. But still everything can be
exchanged with no more difficulties than in any other
2WD buggy. |
|
|
|
Cheers!
From bottle to body... |
|
|
|
Empty 2.5 litre PET bottles come in handy whenever you feel the need
for building your own bodies or rear wings. (CocaCola called it the "shape
bottle" for a reason!) Acting like heat shrink
tubing when treated with a hot air gun they wrap tightly around the
Piranha body mould carefully shaped out of balsa wood.
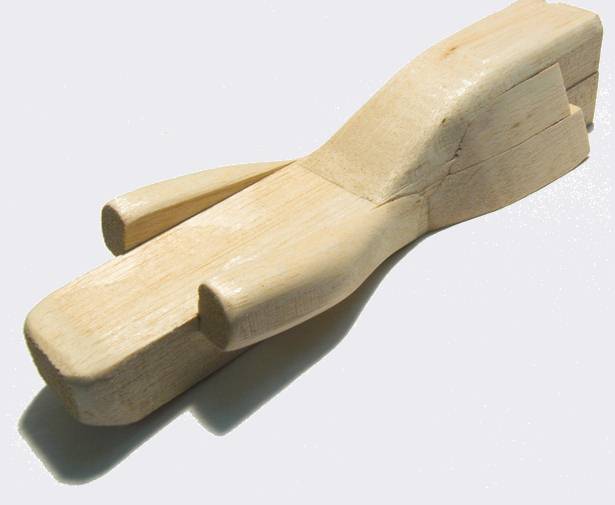
A PET body like that comes out extremely light weight - without
losing any strenght when compared to polycarbonate shells. The body
can be painted with your usual acrylic based polycarbonate paint.
A detailed how-to on moulding your own parts using PET bottles can
be found
here!
|
|
|
Test-Drive! |
|
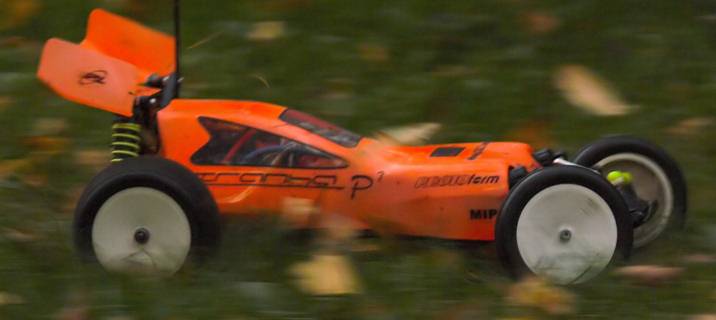
|
How's it gonna
drive? Was it worth the effort? Please let that chassis hold!
… Thoughts like these cross your mind when the battery is
connected for the first time and the control-LED of the speed
controller lights up. Driving a car that took way more time and
commitment than a kit or even a ready-to-run for the very first
time triggers totally different emotions. Just like launching a
new untested sailplane. Well, the Piranha P2 was spared any
flights at the beginning so the tension loosens as the sleek
buggy rolls off unhurriedly. The P2 cannot be compared with its
aquatic namesakes yet - all the better for trimming the steering.
Some cautious cornering, then comes the straight; the first
opportunity to kick it in the guts: Theoretically, the Piranha
accelerates about 20 per cent faster than its XXX predecessor.
In practice the P2 is simply as swift as an arrow - so fast that
the next corner is taken off-the-road for safety reasons. It soon
becomes clear that the Piranha P2 has a noticeable tendency
towards understeering - given the absolutely stable handling
performance this is an extremely positive sign for a rear wheel
driven mid motor car that woulld be expected to show a greater
oversteering tendency. Understeering can be traced back to the
facts that the front suspension setup is rather hard and the
steering throw was reduced to a mere 70 per cent. Latter had to
be done because the the steering linkage did not have the
optimum lenght. So it's confidence and a good feeling on the way
back to the workbench to prepare the Piranha for the nex test
session. By the way - the reversed motor could do with a little
more timing ... !
There are many ways to R/C
car racing. Being engineer, test pilot and race driver at the same
time is definitely one of the most entertaining ones. It needn't
automatically be a high end racer or even a world championship car -
those models are mostly built by renown manufacturers with years of
racing experience.
But also as a layman one can be proud of one's work - and getting a
whole lot of background information about setup, suspension dynamics
and materials can be listed as positive side effects.
A second hand car is easy to get and helps making your first steps
towards the DIY buggy!
More infos about a new CR-based Piranha at our messageboards! |
|
Text and photography by Aaron Banovics,
translation by Markus Simon
This article has been published on
www.offroad-cult.org
on 05-31-2007.
|

|