|
|
|
»
Deutsche Fassung: hier
klicken! |
Kyosho
Inferno ST US Sports
Part #1:
Overview and Construction
|
|
|
|
|
Once upon
a time ... |
|
|
|
"Inferno-ST"
- with some old stagers this name might ring a bell. Right, Kyosho
offered an "ST" model in the age of the Turbo-Inferno. Based on an
already ten year old buggy chassis, with bigger tires, adjusted gear
reduction and a truck-bodyshell Kyosho's first ST model was
virtually the ancestor of the now popular truggy class.
The truggy of today is designed around a buggy chassis just as well.
It is therefore stretched and equipped with longer suspension arms
and shock absorbers. The bigger tires (about 140 mm in diameter) are
compensated with a bigger spur gear in order no to overexhaust the
engine.
Like that, truggies are nearly all-purpose models: Thanks to the
buggy-like suspension they cut a fine figure on the race track, but
the massive tires together with a vehicle-width of clearly over 400
mm and long suspension travel allow full blown bash heats just as
well.
Whatever use the truggy is put to - the buggy chassis and the
drivetrain normally stick it out unscathedly. 1/8th scale buggies
got their reputation of being the toughest and sturdiest offroaders
for a reason.
So it was just a matter of time until Kyosho would enter the new
scene with a truggy model based on their pretty successful Inferno
MP series. Now there are already three versions to choose from:
For this review
Kyosho-Germany
provided us with the Inferno ST US Sports which will possibly
replace the Sports as a beginner model.
The following remarks therefore refer to the test model and cannot
be unrestrictedly generalized e.g. due to serial dispersion,
especially with the measured values.
Although "RTR"
might sound like "unwrap and go" such models should always be
disassembled and checked. Gas powered models, especially of this
size, can be dangerous when out of control due to a loose bolt. You
also get to know the vehicle along the way - sort of dry practice
for the real thing, in case that maintenance work and repairs have
to be done.
TECHNICAL
DATA
Length:
500mm
Wheelbase: 350mm
Width: 415mm
Heigth: 150mm
Weight: 3450g
(manufacturers' data)
SUPPLEMENTARY
EQUIPMENT
27MHz transmitter,
servos, receiver
4.6ccm engine
fuel bottle
glow plug heater |
 |
All hyperlinks marked
like this will be opened
in a new browser window!
|
|
|
A look under the hood
- and a quick overview |
|
|
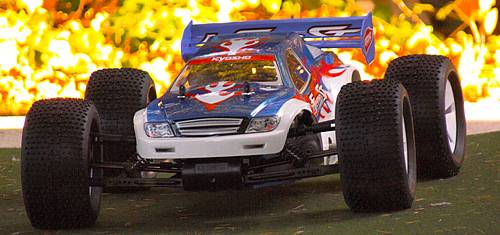
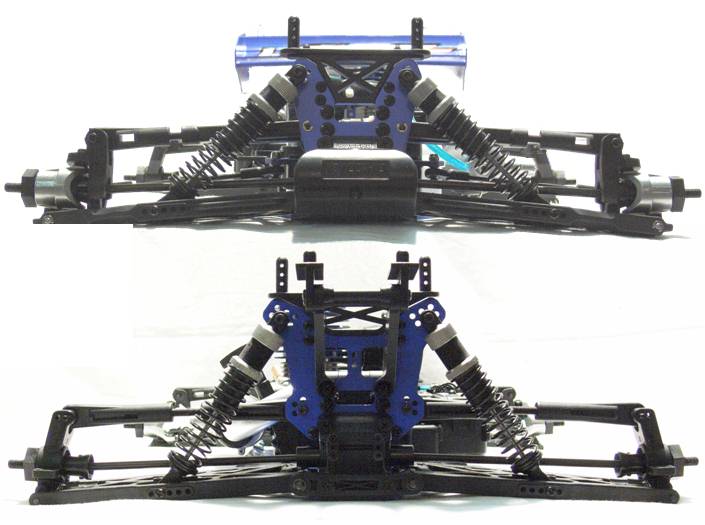
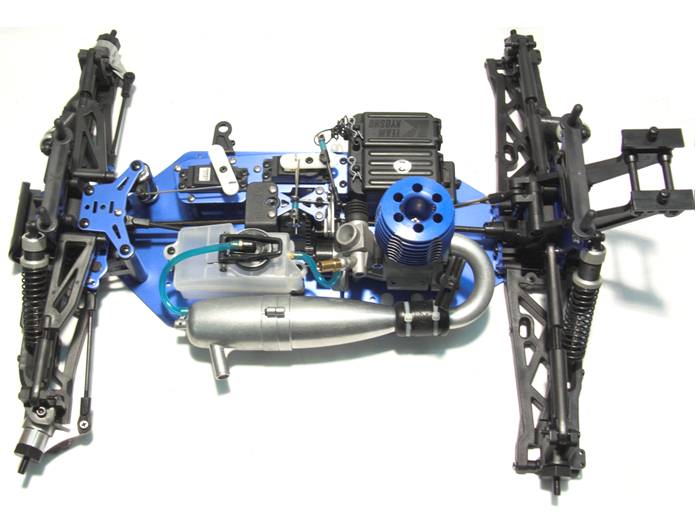
Without tires and body the Inferno
ST could nearly pass for a buggy. On the second glance the longer
suspension arms stand out - and - for the connoisseur of the MP 7.5
buggy chassis - the chassis plate that has been stretched to either
end.
The layout feels pretty clean. At the moment Kyosho is the only
manufacturer that does not take advantage of a laydown steering
servo. By this they fail to take the "important" opportunity to
lower the center of gravity by 0.2 millimetres; instead Kyosho seems
to concentrate on the nitty-gritty: an upright steering servo with a
good linkage lineup causes linear steering action and is exposed to
less transverse force at maximum throw than a laydown steering
servo.
The radio box can be numbered among the more spacious ones in the
buggy/truggy class and offers seperate compartments for receiver and
battery (up to five AA cells can be fitted in easily).
The fuel tank is located to the left of the center diff and equipped
with an overfill fuel channel and an internal stone fuel filter (to
avoid air bubbles in the fuel line and ensure stable engine
operation even if the Inferno ST takes a longer spread-eagled rest
on its roof after a rollover). Power is delivered by a 4.6ccm GXR-28
pull start engine connected to a two-piece aluminum tuned pipe.
|
|
|
Appraisal:
driveline and suspension |
|
|
|
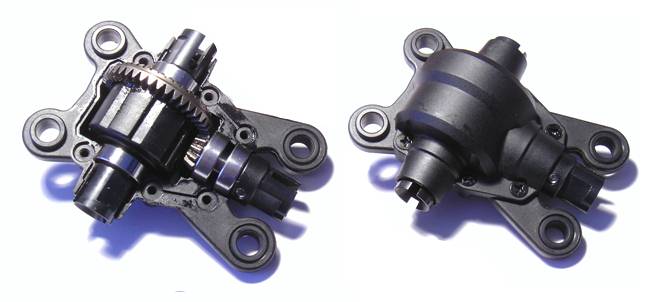
Once again we
start our review where there is not much left to disassemble: The
differential gears. As usual, the Inferno ST US Sports is using
three of them, the centre differential balancing differences in
rotational speed between front and rear suspension and thusly
allowing to adjust the braking balance.
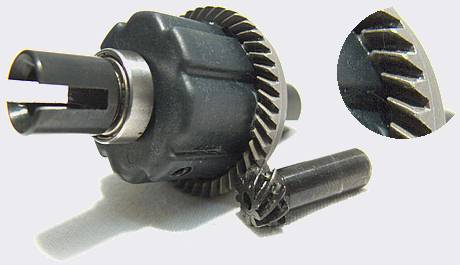
The differentials of the Kyosho truggy are built like one would
expect them to be for an 1/8th scale off-roader: rugged o-ring
sealed plastic body, steel crown gear and solid outdrives. But two
juicy details are hidden inside the diffs of the ST US. |
|
To withstand the greater forces that
would come up in a truggy, Kyosho decided to use spiral gears for the
differential. In comparison to straight cut bevel gears this type has a bigger
contact surface and a better meshing - in short the spiral
gears run smoother and can take greater forces.
Although the crown gear is cast
steel the (sharpened) macro view shows an amazingly high surface
quality. The bevel gear is made of machined steel and hardened
afterwards. |
 |
|
A type of precision rather uncommon
for this price range becomes apparent here: With 7.98 millimetres
the bevel gear shaft clears the bearing for only two hundredths of a millimetre - a sensible measure given the precision gears.
Normally the clearance ratio of the bevel gear would be four
hundredths of one millimetre. |
|
 |
Now, if the intricate gears should
enhance the stability of the differential then the things that lurk
inside it can (not even) be understood as a paradox:
The differential is ready for a four spider setup but with the
notorious SPORTS-series traditionally only two spiders will manage
to cheat their way into the diff case.
Bevel gears (IF-102) and satellite shafts (BS-107) are needed
for upgrading two differentials. To rebuild the center diff as well,
a second IF-102 bevel gear set becomes due. Four bevel gears will
not only enhance load transmission but also stabilize the outdrives.
The upgrade will cost you €20 (Kyosho Germany retail price) |
Realistically
speaking the stripped down diffs will bear up for quite some time.
Comparable amounts of torque are transferred upon the crown gear and
(with two spiders) to every bevel gear due to the different
distances of the gears from the rotational axis of the diff.
Nonetheless four spiders will stabilize the outdrives in two planes
(up/down - left/right) under load condition while two bevel gears
can only support them in one plane. As a consequence greater stress
is put upon the friction-type bearings of the outdrives. If this
caused bearing play the meshing between sun- and spider gears would
be impaired - this increases diff wear and the bevel gears will be
ruined due to excess bearing clearance.
Anyway, the high grade of the assembly
has to be appreciated: the diffs are well shimmed, run
smoothly and are filled with silicone oils of different viscosity. (front:medium,
center:hard, rear:soft) |
|
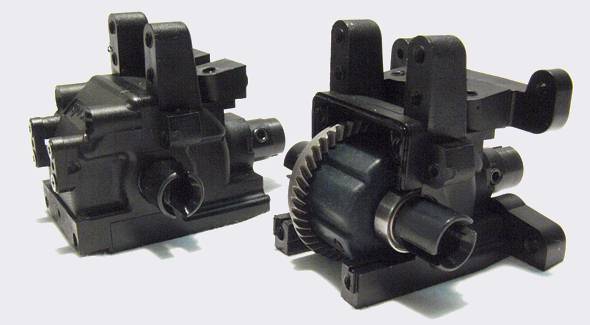 |
The gear boxes are of the 'one-chunk wonder' type; meaning that they will not only encase the
diff and bevel gear but also hold the caster blocks and the shock
towers. Therfore the gearboxes have to be built sturdier than the
elastically supported boxes of the Robitronic Mantis Truggy for
example. (click for a
picture)
Both gearbox halves feature a sealing lip and fit together without
any play. The differentials are factory shimmed - and dead right
they are. After putting together both gearbox halves I can say that
in my whole hobby career I have never experienced a bevel gear that
would run so smoothly and nearly noiseless. No sticking, no tight
spots, no rattle, no tedious fiddling around with shims... the gears
mesh perfectly without even having been run in - it's just wonderful!
For this reason these gears can be counted to the high-grade ones on
the current buggy/truggy market. Enough grease has been supplied (which
was just removed in order to take some photos) so there are no
complaints about the assembly of this critical component - when
counting the economised bevel gears to the equipment section.
With "e-clipped" hinge pins the
suspension is connected to the gearboxes. It can only be
distinguished from a buggy suspension when compared in length.
Dirt-shielded c-hubs remain in the realms of the ST-R. |
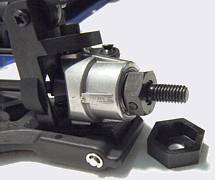 |
The wheel adaptors are also different
from the ST-R and the buggy standard: instead of an aluminum hex
with M10 fine thread the ST feels more at home with the 1/10th
scale standard: The wheel is secured to the axle by an M6 locknut. The
14 millimetre metal hex is grown to the standard 17mm size with the
help of a plastic adaptor. With the 14 millimetre hexes some monster
wheels can be fit on too - provided that they got an inner rim diameter of
at least 77 millimetres and 36mm maximum offset.
The whole concept may look a bit funny to 1/8th buggy drivers and is
probably the result of budgetary cuttings when compared to the ST-R.
But thanks to the chequered locknuts the system provides a reliable
wheel mounting.
|
The Inferno
ST
uses e-clips on nearly all suspension parts.
The more elegant screw-pins are only sporadically
used at the shocks and the upper suspension arms. |
 |
|
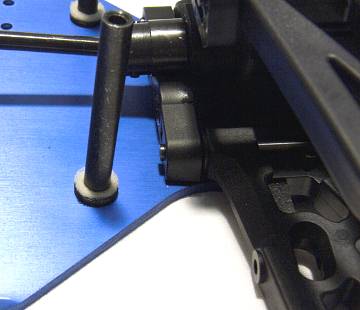
Luckily the plastic parts
are generously sized so that there are one or two spots
left where an M3x5mm grub screw can be put in to secure
the hinge pins, witch need some notching with the dremel
where they meet with the grub screw. The forward
pointing e-clip should remain on the hinge pin. |
|
 |
|
No
set screws are needed at the front suspension arms
because the front bumper keeps the hinge pins in
position! Therefore the e-clips on the back side can
also be kept as spares. |
|
|
|
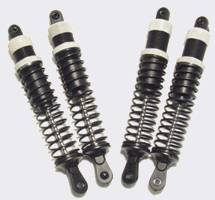
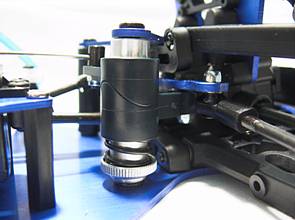
Kyosho goes plastic with the shock
absorbers.
On both front- and rear suspension they are 116 millimetres long and
can only be distinguished by the minor spring preload at the front. |
 |
The preload (and therefore the ground
clearance) can be easily set by a knurled nut so there is no need
for plastic clips.
From the outside the shocks give a good impression. Even though they
are not as perfectly filled as the Robitronic Protos shocks they
feature an excellent smoothness not often found with RTR-models. The shock absorber
on the top right picture has been quickly compressed for a couple of
times. However the photo shows absolutely no leaking of oil.
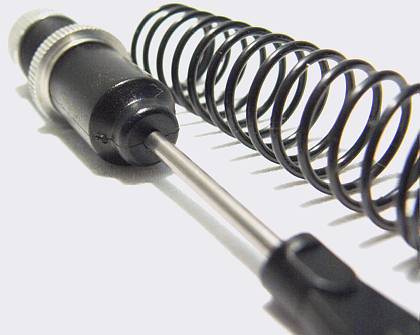
Perfectly recognizable though is the absence of a securing clip. That
means the sealing o-rings are installed into the
shock body from the inside - not so great. The shocks generally don't
appear
maintenance-friendly at all because the damper cap is likely to cant
while screwing down and can only be tightened with the guiding help
of the knurled nut. (in case it remained on the shock body in the
disassembly process) |
 |
The first rebuild will not
be too far away because there is no way to fix any shock
boots to the smooth body.
Shock absorbers of equal quality like from the
Robitronic Protos or the Sports buggy series (MP 7.5
Sports) are favourable here.
If the rigidity of the
plastic shock body is adequate -especially with the
almost lay-down front suspension- remains to be
seen.The
shock towers are taken directly from the Inferno MP 7.5
buggy. Unlike the ST-R the ST has a more of a
laydown
front shock geometry due to a smaller shock tower.
A thickness of 2.9 millimetres may not be too
overwhelming but the low-mounted body posts and the
truggy bodyshell should present an appropriate
protection for the shock towers so no bent parts have to
be feared of. |
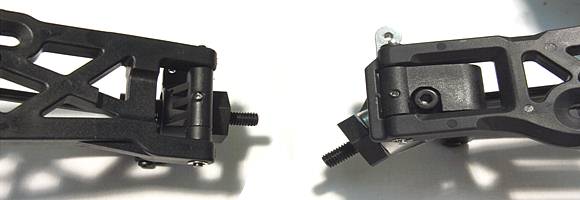
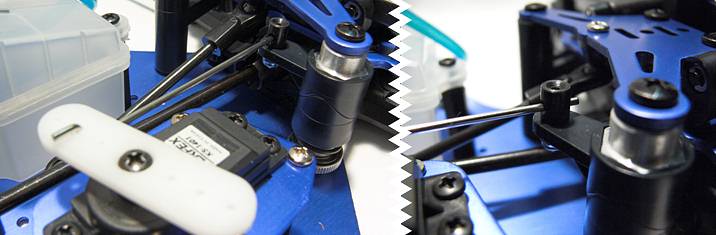
The shock mount turned
out nice: At the suspension arm screw-pins
are used - unlike the more complicated type on the ST-R
which employs grub screw-secured rods.
At the shock
tower the steel ball is held in place by an
Allen screw and a locknut on the rear side. The
chequered locknut is pressed against the shock tower
when tightened and thusly prevents twisting. This type
of mounting reminds a bit of the Lunsford Racing quick
change system.
Equipped only with an Allen wrench and a Phillips
screwdriver shock positions can be changed quickly. In
order to take advantage of this feature the ST offers
five mounting holes on each suspension arm and even more
on the shock towers. (four at the front, six at the rear) |
 |
|
 |
|
 |
| Power
transfer is done without universal shafts
but the suspension is built so
that the dogbones will stay put - without the
need of lugs - over the whole suspension
travel. Furthermore there is enough play so
that the dogbones will not bind up or fall
out, even when facing flex which is
generally inherent with suspension arms of
this length - nice job! |
|
|
|
|
Chassis details |
|
|
|
Because Kyosho's
Inferno ST follows the classic buggy concept there are no real
surprises in between the front and the rear end.
But it should not remain unmentioned that assembly-
and material-quality of the (plastic-) parts is as excellent as
the assembly of the RTR-model.
|
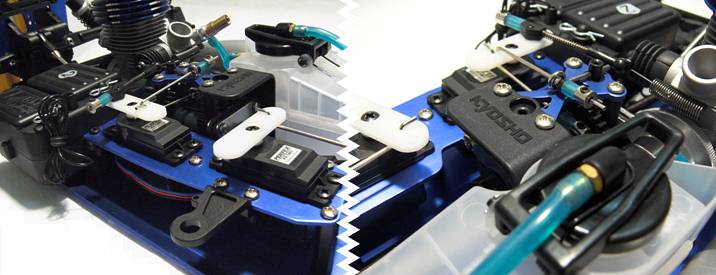
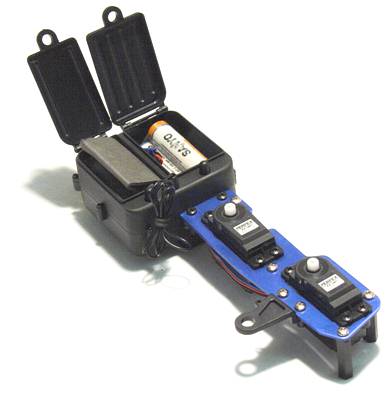 |
Eight bolts
(and the two servo screws) have to be loosened in
order to take out the R/C unit of the Inferno
ST.
As mentioned in the beginning, Kyosho laudably
employs servos mounted upright. Hence the radio
plate is exclusively held by four plastic posts.
(and the fourfoldly attached radio box)
In comparison to their MP6 predecessors these
posts have become way sturdier so that upgrading
them with aluminum posts (IFW-113) does not seem
necessary even with stronger servos.
The servos that come with the kit are both
labeled Perfex KS-1401. The plastic gear servo leaves a
bit of a strange impression but more on that in
the second part!
The radio box is of
the "bigger is better" kind - which is always good thing
to be!
The battery tray will accept nearly any four- or
five cell battery pack. (Here: 5x Sanyo AA 2500 mAh
NiMH - in GP cars only soldered packs should be used!) |
The compartment next
to it is a wee bit smaller. But also here it is
enough for a standard receiver, (42x35x20 mm)
thoroughly wrapped into sponge rubber.
An on/off switch is hidden at the rear side of the
radio box, protected from dust and grime by a rubber
sleeve.
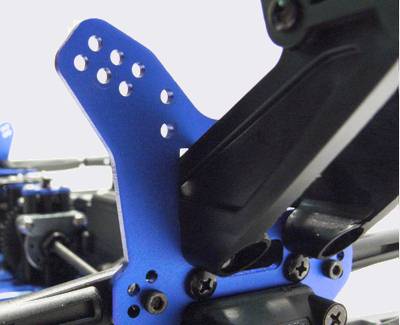
To give the radio plate a more "racy" look it is
equipped with a transponder mount. The position is
rather badly chosen (due to the missing sideguards)
because the transponder dangles more or less freely
in the open. |
 |
|
 |
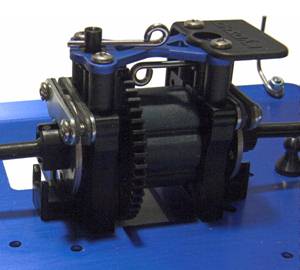
Between the front and rear suspension,
erverything is aligned
purposefully around the centre differential
block.
Latter is equipped with (seperately adjustable)
disc brakes.
In order to prevent canting of the vented steel brake discs a
pair of brake guides is
mounted to the chassis plate. Each guiding thingy
can take up to two discs.
A four-disc brake will not only need further
brake calipers but also longer pad mounting screws.
Talking about the brake calipers: These are
self-releasing, meaning that they do not need
any spring to push them apart after braking. The
calipers have enough play so that they can be
realigned solely by the brake disc - which works
smoothly with the Inferno ST.
To increase the durability of the brake pads
they should be glued firmly onto their steel
shoes! |
 |
The front brake is
equipped with a fuel splash guard. This should
prevent soaking the brake disc in the course of
over-enthusiastic refueling maneuvres and
therefore reducing brake power caused by the
residual oil. In order not to get the chassis
all manky with dirt the tank features an
overfill fuel channel that will accept excess
fuel and guide it through the chassis to the
ground.
As we're talking about fuel: As shown in the
picture below the engine is mounted directly onto
the chassis in good old Sports-fashion, although
(compared to the GS-21R) the crankcase already
has 'proper' mounting lugs. Luckily the chassis
accepts motor mounts but the fact that they are
nowhere to be found in this kit (also facing
equally priced truggy-competitors) is a clear 'no-go'
equipment-wise.
If you wanted to provide your GXR-28 with a more
stable base or race other engines as well you
would have to pay about € 20 (Kyosho-Germany
retail price)
for the engine mounts. (IF-107 and
IF-108 are needed) |
|
 |
To support the long truggy chassis both
gearboxes are equipped with torque rods, the
Kyosho-like design consisting of two ball ends
and a threaded rod.
There are numerous 'hop-up rods' by aftermarket
suppliers that are milled out of an aluminum
block and promise even more rigidity but I have
had positive experiences with the ball end
thingy that can give a little in an emergency
situation. And there always remains the question
of personal taste - whether you like a 'harder'
or a more flexible chassis.
A harder chassis provides a more precise
handling
but setup mistakes are more likely to cause the
truggy behave badly. |
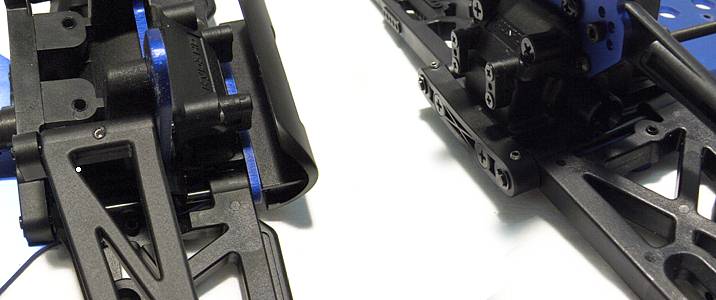
|
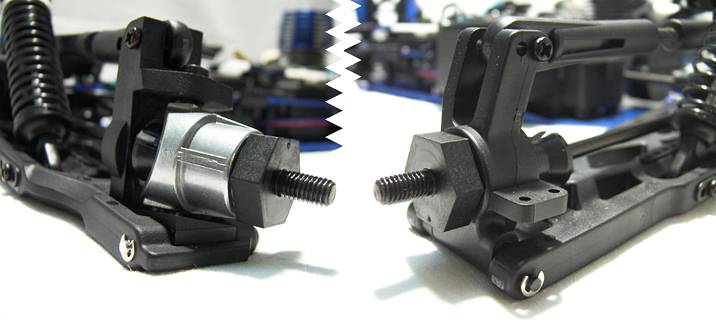
The chassis' flex could cause problems for
totally different reasons. I praised the
suspension because it would -not nearly- let the
dogbones bind up or fall out over the full
suspension travel but the rear part of the chassis might
not come out that praiseworthy.
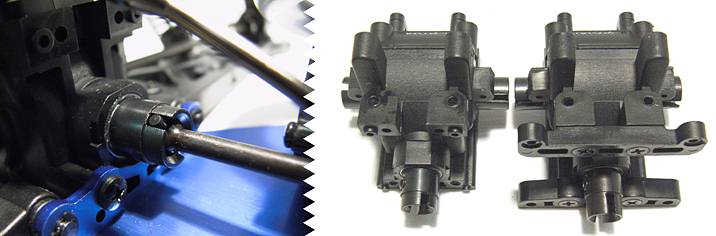
The photo down to the left shows the dogbone to
the rear gearbox. There is not much play due to
corresponding lugs inside the centre diff
outdrives that could give way (eg. after a
harder langing) without risking to bend the
dogbone.
At the same time there is not much left that
could keep the dogbone from falling out if the
chassis flexed too much. There seems to be no
reason to use the short joint cup especially
when a longer version actually exists - looking
at the front gearbox in the picture down on the
right.
For fairness reasons it has to be admitted that
the rear part of the chassis is really firmly
built which makes it virtually impossible to 'tease'
the dogbone out with your bare hands.
Anyway, as an off roader you know the forces
that are at work when you're proverbially off
the beaten track - so only pracitcal
experience will show whether the
short joint cup is enough or not.
|
|
 |
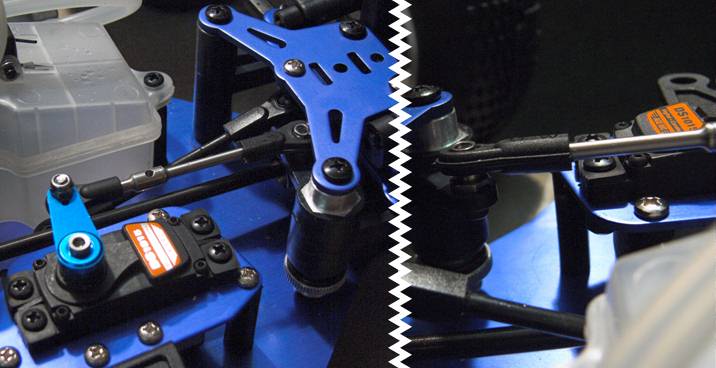
Last but not least
comes the steering. Tried and tested
parts of the eigth-scale buggy-world are put to use. Hollow
6-millimetre steering posts reinforce the front
gearbox - it's just the kind of steering setup
we like!
The beefy steering arms seem to be made of a
harder type of material than the other plastic
parts. The adjustable servo saver features a
heavy spring with a wire gauge of 1.5
millimetres. Out of the box it is set as soft as
possible - supposedly to go easy on the servo
gears.
All in all it's a solid piece of work that will
also get along with stronger servos. (plus 10kg*cm
would be recommendable for the steering) |
|
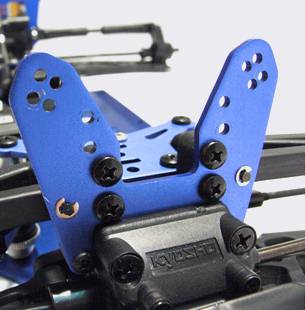
Something
about this steering should look a bit odd
to the
observant reader who has already had contact any 1/8th
offroad car
... the last
hint is provided by the picture on the right -
before the 'puzzle' is solved.
...
...
|
 |
|
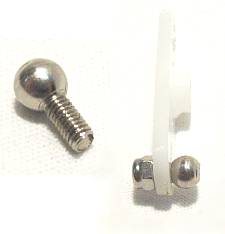
"In dubio pro reo" - and Jamara proved it
with the 'Track-Sau' that it is indeed possible
that a cropped 2 millimetre steering link can
work with a plus 4kg car.
The only thing is: Jamaras' link was two
centimetres short, absolutely parallel to the
push/pull direction and connected to the
steering arm by a five millimetre double-sided
adaptor. (see
picture)
Kyosho's version is about
three times as long, not parallel to the
push/pull direction (because the linkage
declines a bit towards the steering) and is
connected to the steering arm by a three
millimetre single adaptor. Lacking a counter bearing this induces more play
than all the other connections of the steering
altogether.
The good news:
Even with a supply voltage of 6 volts the 'bent
wire' remains pretty unimpressed by the (servo
saver-alleviated) steering power of the servo.
The bad news: It needs a much stronger servo and
a way harder servo saver to tap the full
potential of the Inferno ST. |
|
 |
The Tragedy behind it? For just € 10 you could
have an 'offroad-proof' luxury linkage using a
stainless steel turnbuckle and six millimetre ball ends
free from float!
It remains unclear, why Kyosho decided to
give up the perfectly able linkage of the MP-6
Sports Buggy and use the linkage shown above. |
|
|
|
Steering
- reloaded! |
|
|
|
OK, let's assume that you
overlooked the last couple
of pictures ...
Then here's how to assemble the steering linkage of Kyosho's
RTR-truggy! ;-)
First some thoughts:
-
In principle a linkage could be
everything stable enough and with the possibility to mount it onto
the servo saver with an M3 screw. Depending on the construction
the servo saver might have to face "outwards" because the linkage
could touch the reinforcement plate which connects the steering
posts to the gearbox. I'd like to avoid the outward
steering link, the inward-type looks classier and is better
protected.
-
For Kyosho is using an upright
steering servo against current (promotional) opinions the merits
of this kind of setup shold be taken advantage of. This implies a
parallel linkage lineup from steering arm to servo saver to avoid
transverse force.
It can be difficult to
get the linkage "high enough" on the servo side.
Especially
when the servos were mounted without vibration-reducing rubber
pads.
For cases like that Academy or HPI offer threaded 5.8
millimetre ball studs with a low installation height. A ball
stud like that is attached to the servo arm with a locknut.
Another ball stud is used at the servo saver. It should be one
of the kind that have to be secured with a screw from below -
don't forget your threadlock!
A turnbuckle is used to connect both ball ends - it should be
between 50 and 55 millimetres long. |
 |
|
 |
|
 |
The pictures above show that I've
worked ahead a little bit and got rid of the original servo in
favour of Thunder
Tigers' DS1015. The torque readings in part two will show why.
Another hint: The Inferno ST US's steering
uses only friction bearings but still it's not a bad idea to prevent dust from getting into them. Before the
steering arms are set onto the posts a piece of foam rummer
should be put on. This helps reducing the steering float and
furthermore no (astonishingly fast) grinding dust can settle.
Foam rubber is also vital should you choose to upgrade a
ball-raced steering: The small ball bearings are pretty
damageable!
|
|
|
|
Checkpoint! |
|
|
|
Interim
results - truly not easy!
Kyosho's newest RTR-Truggy is a sophisticated concept. But
in practice it seems rather rough - perhaps an allusion to
the preferential field of application of the Inferno ST?
First example: On the one
hand the US-Sports excels with luxury gears - but then the
budgetary red pencil gets in the way of a consequent
continuance that would allow for four bevel gears. (at
least for the front and rear differential)
We'll have some other examples coming along until the final verdict.
To push this
in perspective: It's laudable when a manufacturer like
Kyosho takes the meaning of "RTR" serious and presents an
excellently assembled car - quality control will have its
share at the € 559 retal.
And apart form the example listed above - plus the missing
engine mounts and the absurd steering linkage - at least
the rest of the provided equipment is about average.
A well equipped fuel tank (stone filter, overfill
protection
and good fittings), steel gears, well glued high-grade
tires with foams and the big separated radio box millitate
in favour of Kyoshos' truggy.
Only: They can not really drown the bitter smack that is
left by the shortcomings that are way below class
standard.
|
|
Text and photography by
Aaron Banovics,
translation by Markus Simon
This article has been published on
www.offroad-cult.org
on 12.12.2006.
|

|